Add a Fuel Tax Trip
This article provides instructions for entering and managing Vehicle Trips in the Fuel Tax module of Vehicle Management. Users begin by locating a Unit through its Code or VIN, then enter required Trip Details such as Work Month, Trip Number, Odometer Readings, and Completion Status. For each jurisdiction traveled, users add Trip lines with Mileage, Tolls, Empty/Unladen Status, and Fuel Purchases categorized by specific Fuel Codes (e.g., Receipted, Non-Receipted, Bulk, Reefer). The system automatically calculates totals, allows lines to be added or deleted, and verifies data against system settings, flagging errors for correction. This process ensures accurate Trip tracking and compliance with IFTA and internal reporting requirements.
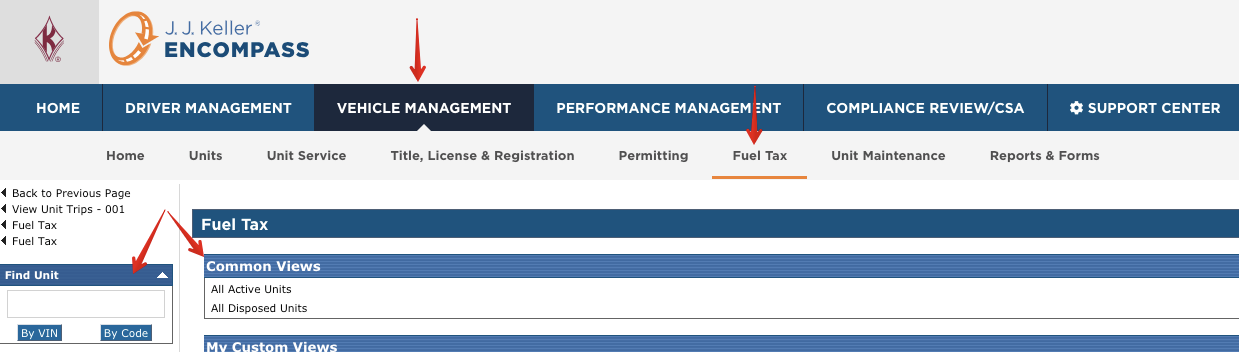
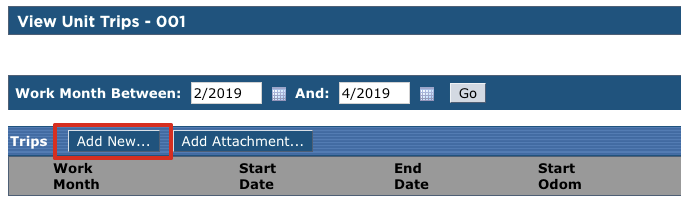
From the Fuel Tax tab in Vehicle Management, find the unit the trip should be attached to. This can be done by entering in the Unit Code or VIN in the search box on the left, or by clicking on All Active Units and finding the desired unit. Click on the unit code, and then click Add New...
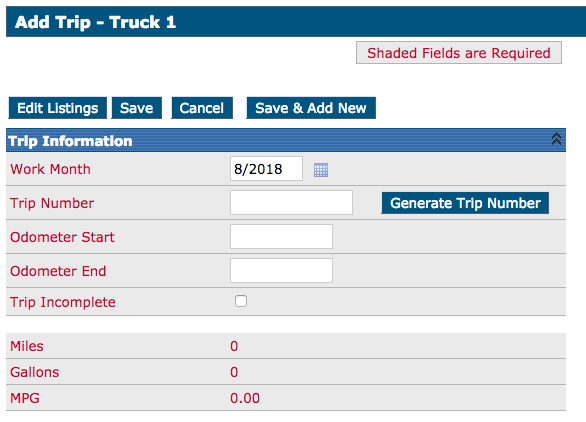
Under Trip Information (all fields marked in Red are required):
- Work Month is the month in which the trip occurs.
- Trip Number needs to be unique. Generate Trip Number can also be used to have the system create one.
- Odometer Start will show the previous odometer reading if this option is enabled in Trip Entry Options. If not, enter the starting odometer reading.
- Enter the Ending Odometer.
- Trip Incomplete check box is used when data has been entered but not the entire trip. This tells the system to not verify the data until the box is unchecked.
- Miles, Gallons, and MPG are automatically calculated based on the information entered in the trip lines below.
Adding the trip lines:
-
Select the appropriate State/Province code from the drop down menu in which the mileage was traveled.
-
If the setting was enabled in the settings, the Date will automatically fill, otherwise enter the date in which the mileage occurred
-
Enter the Odometer reading as it was when the vehicle started driving in that jurisdiction. Nontoll miles will automatically populate. If there are any Toll miles, those would be entered in the next column. The Total will then be automatically calculated.
-
If the mileage was done while empty, or unladen, check the box under E to indicate this.
-
Fuel: Any fuel purchased in the jurisdiction can be entered under Fuel #1, Fuel #2, and Fuel #3. See the Fuel Codes directly above the entry grid (1). The system defaults to Gallons/Liters Receipted (GR/LR), but there are a number of other fuel codes that can be used. Each fuel code will contain two letters; first G or L depending on the unit of measurement being used (gallons or liters) and second, the type of fuel being purchased:
-
R - Receipted: Should be used if there is proof of purchase, i.e. a receipt.
-
N - Non Receipted: Should be used if there is no proof of purchase, i.e. no receipt (Note: Any fuel labeled as Non Receipted will NOT be included for IFTA tax credits but will be used to calculate Fleet MPG).
-
P - Tax Paid Bulk: Should be used for bulk fuel in which tax was already paid (Note: Any fuel labeled as Tax Paid Bulk will be included for IFTA tax credit).
-
T - Tax Not Paid Bulk: Should be used for bulk fuel in which tax has not been paid.
-
B - Bulk: This one isn't suggested for use - it is shorthand and will automatically change to P (Tax Paid Bulk) or T (Tax Not Paid Bulk) once the trip is saved. Use either P or T instead.
-
F - Reefer: Should be used if fuel is Reefer fuel and subject to rebate (Note: This would not be used for IFTA as Reefer fuel isn't subject to IFTA, but would be used for tracking purposes instead).
-
Note: This field is only for the amount of fuel purchased. See the following pages for instructions on how to add more detail regarding the fuel purchase.
-
-
If additional lines are needed, click Ins toward the right to insert a new line. If a line needs to be removed, click Del to remove the line.
-
Click Save to finish, or Save & Add New to save the information and display a blank Add Trip screen.

When saved, the data is verified per the settings in Data Verification Settings under Setup. Any errors will show up in Red.