Manually Enter 10-Key or Grid Logs
This article explains how to manually enter driver Hours of Service (HOS) logs in Encompass® using either Ten-Key Entry or Grid Entry. Administrators first access a Driver’s HOS Profile via Drivers > Hours of Service and click Add Log. In Ten-Key Entry, duty statuses, start/end times, miles, and other log details are entered using a numeric keypad for efficiency. In Grid Entry, Administrators select points on a visual grid corresponding to duty status and time, with the left side indicating duty status and the bottom showing time increments. Both methods allow completion of additional log details, such as DOT violations and notes, before saving the log.
Ten-Key Entry
Ten-key entry refers to the use of the numeric keypad on a keyboard to enter numbers quickly and efficiently. You can manually enter logs for drivers in Encompass by using ten-key. First, locate the specific driver's hours of service profile. Go to Drivers > Hours of Service > select the driver to open their profile.
 >
> 
Click Add Log.

Enter the Log Information as applicable.
- Log Date: Enter the Date
- Driver Type: Was the driver Property Carrying or Passenger Carrying? (System defaults to Property Carrying.)
- To/From Work Location: This will be off initially; if the driver was returned to and released from reporting location, check this on. It will affect whether the system honors the 100-mile exemption and extra hours (if exemption is used).
- Average MPH: It will default to the rule set. But you can change if needed.
- Tractor Number: Enter the tractor number (or numbers with a comma) the driver used with the log.
- Trailer Number: Enter the trailer number (or numbers with a comma) the driver used with the log.
- Shipment Info: Enter shipment information for the log.
- Total Miles: This will be blank to start. The distance for each driving segment will sum for the "Total Miles" for the log.

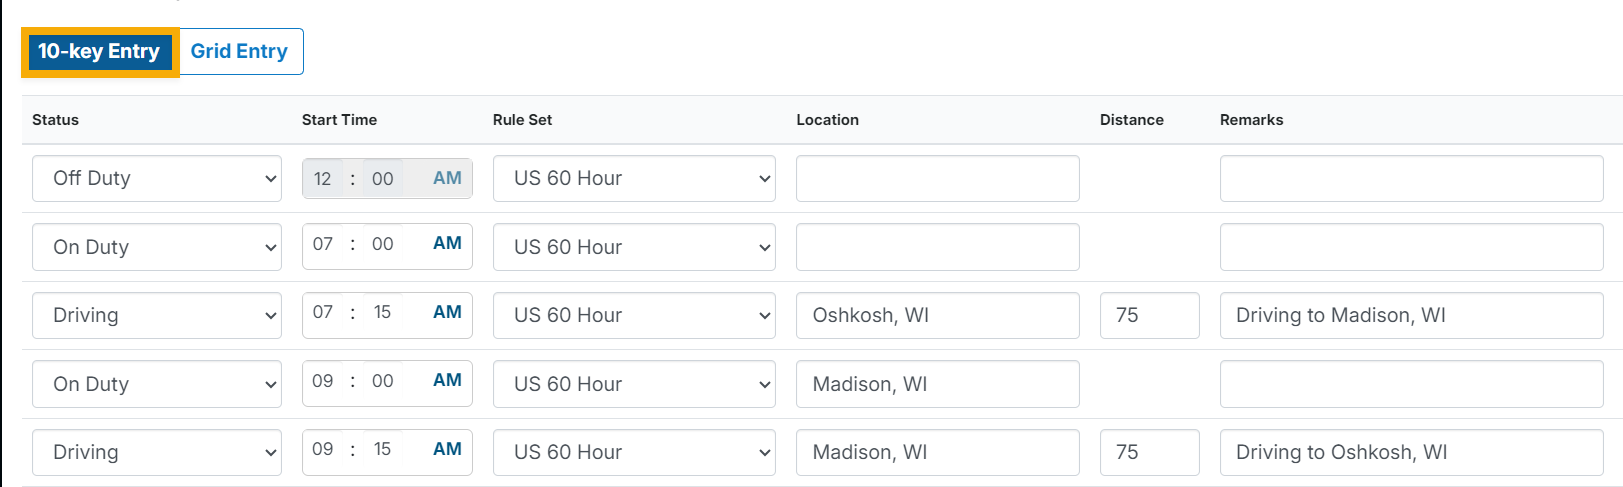
Next, scroll to the log entry area. Ensure 10-key Entry is selected. Then, utilize your 10-key process on your keyboard to enter duty statuses, start times, distance, etc.

Complete the rest of the log (ie. DOT Violations, Notes, etc.) as applicable. Save when finished.
Grid Entry
First, locate the specific driver's hours of service profile. Go to Drivers > Hours of Service > select the driver to open their profile.
>
Click Add Log.
Enter the Log Information as applicable.
- Log Date: Enter the Date
- Driver Type: Was the driver Property Carrying or Passenger Carrying? (System defaults to Property Carrying.)
- To/From Work Location: This will be off initially; if the driver was returned to and released from reporting location, check this on. It will affect whether the system honors the 100-mile exemption and extra hours (if exemption is used).
- Average MPH: It will default to the rule set. But you can change if needed.
- Tractor Number: Enter the tractor number (or numbers with a comma) the driver used with the log.
- Trailer Number: Enter the trailer number (or numbers with a comma) the driver used with the log.
- Shipment Info: Enter shipment information for the log.
- Total Miles: This will be blank to start. The distance for each driving segment will sum for the "Total Miles" for the log.
Next, select the Grid Entry tab.

You will then begin clicking on the grid and selecting specific points to indicate a duty status for a specific time.
Click on a point again to Edit information regarding the specific duty status.


NOTES:
- The left side of the grid indicates the duty statuses:
- OFF: Off Duty
- SLP: Sleeper Berther
- DRV: Driving
- OND: On Duty
- The bottom of the grid indicates the time, midnight to midnight:
- 0:00-23:00 for Military Time
- 12AM-12AM for standard time
- The time displayed on the grid is determined by the selection made in Settings > HOS Preferences.

- As you are adding and editing points on the grid, the 10-key Entry tab is simultaneously updating with the information entered.
When all duty statuses are selected on the grid, continue filling out the log information such as DOT Form & Manner Violations, Notes, etc., if applicable. Save when finished.