How to Use Recordkeeping Grids
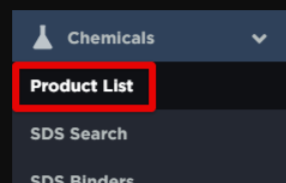
Recordkeeping grids offer efficient, "one stop shop" displays for Safety Management Suite users to see various data in one "view". For demonstration purposes, this article specifically showcases the grid for the Chemicals Product List. This information can easily be replicated for other recordkeeping grids in SMS.
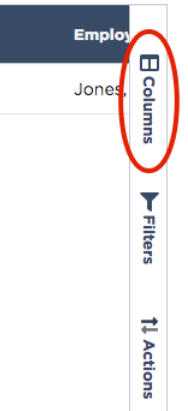
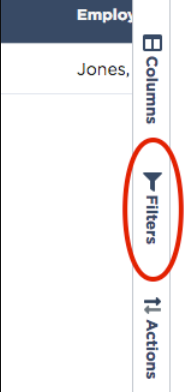
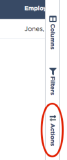
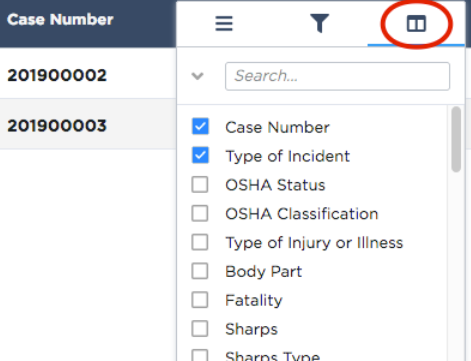
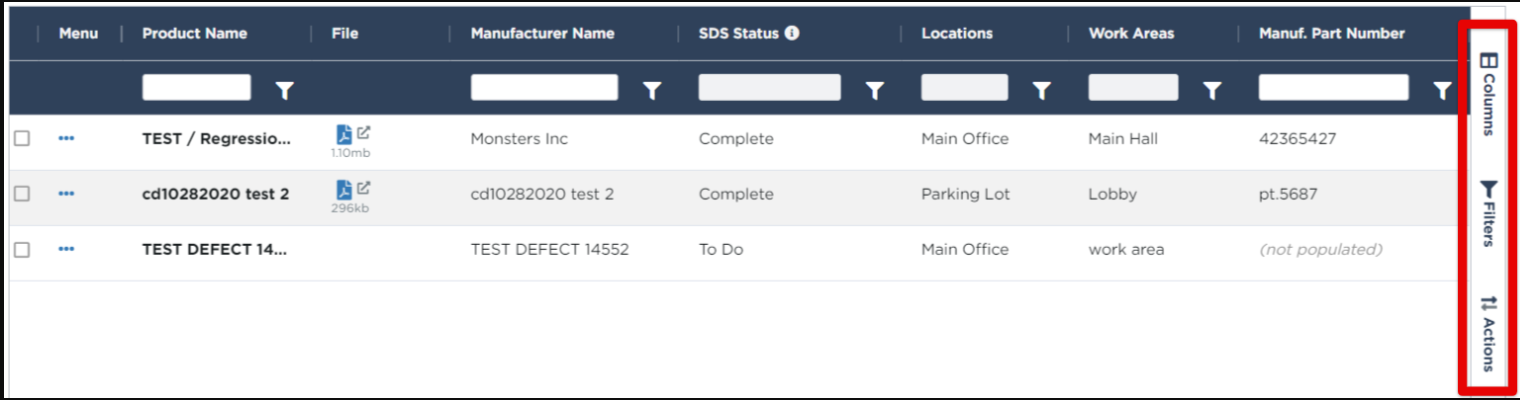
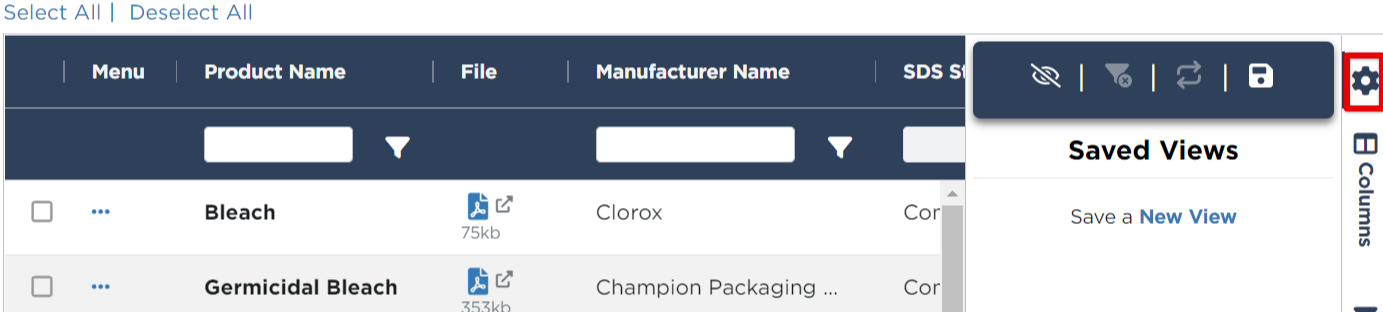
To the right of the grid, select Columns, Filters, or Actions.
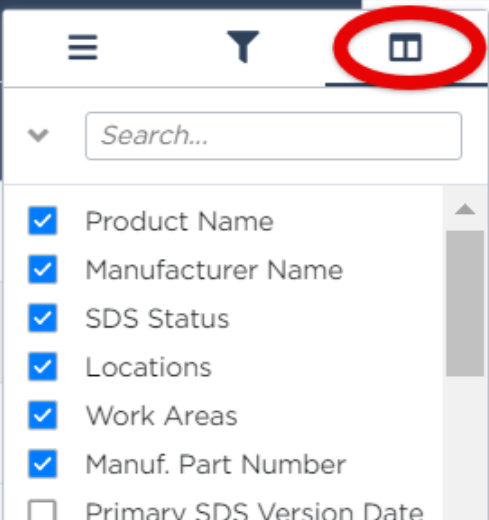
Columns
From the Columns fly out, select the data columns you would like to see displayed within your grid. The grid will update automatically as you are selecting/deselecting specific column types.
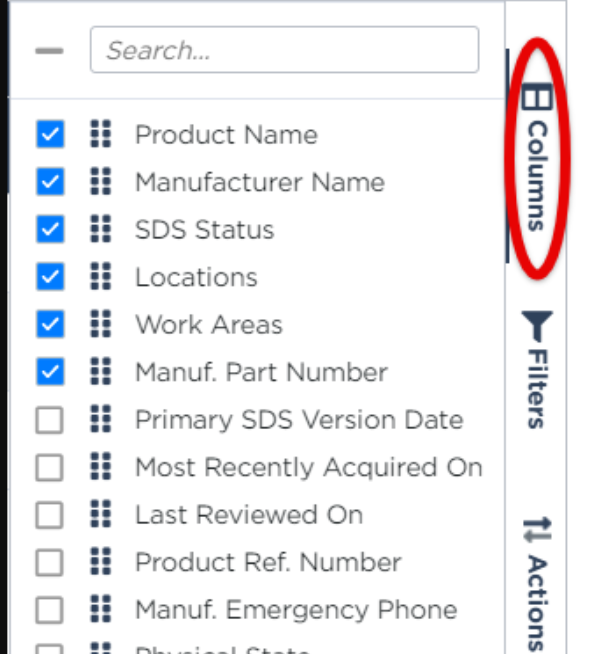
Columns can also be rearranged for custom viewing. Simply click and hold the column and drag into your desired order.

Additionally, columns can be resized by placing your cursor between two column headers, clicking and dragging to your desired size. Or, you can auto-size a column by placing your cursor on the right edge of the column header to reveal a double-sided arrow. Double click the edge of the column and the column will snap to an auto-sized width.

Other Column Functions
|
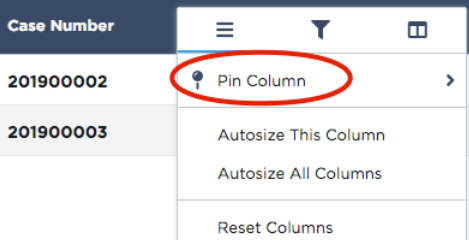
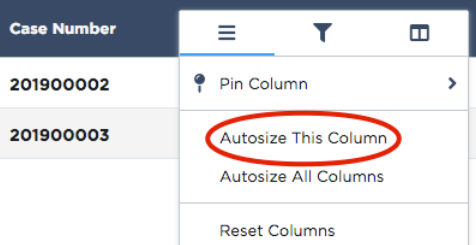
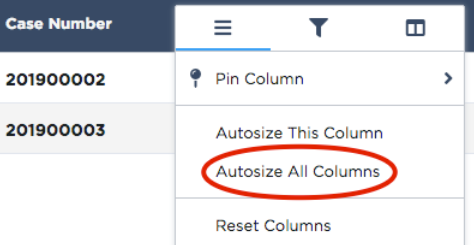
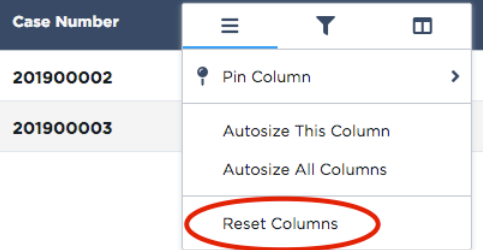
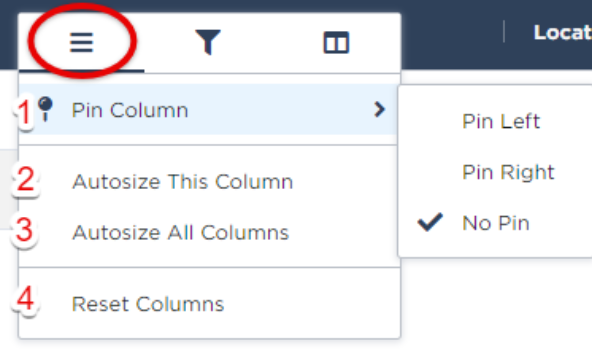
Hover over a column header to reveal a stack of lines; click to open additional options. 1. Pin Column: Pin a column to the left or ride side of the grid 2. Autosize This Column: Snaps the column to an auto-sized width 3. Autosize All Columns: Makes all of the columns in the grid the same size 4. Reset Columns: Resets all column selections, column widths to the system default, resizes all columns to |
|
|
Filter within Columns: Some column filters allow for specific selection/s or selecting variables (Contains, Equals, etc.). Other columns that are "Company Data" are searchable filters, as shown in blue. For more specific information and features about the filtering functions, see the FILTERS section below.
|
  |
|
Column Selections: Click the column icon to reveal another place to select additional/deselect current columns. |
 |
| Click a column header to sort the grid data in ascending or descending order. |  |
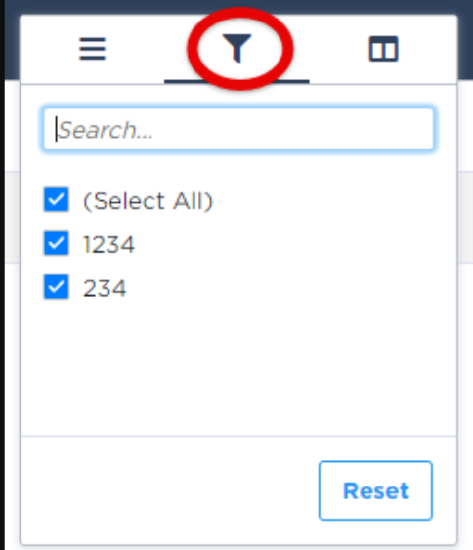
Filters
Filters allow you to narrow down the results of the individual columns even further to display specific data in the grid.
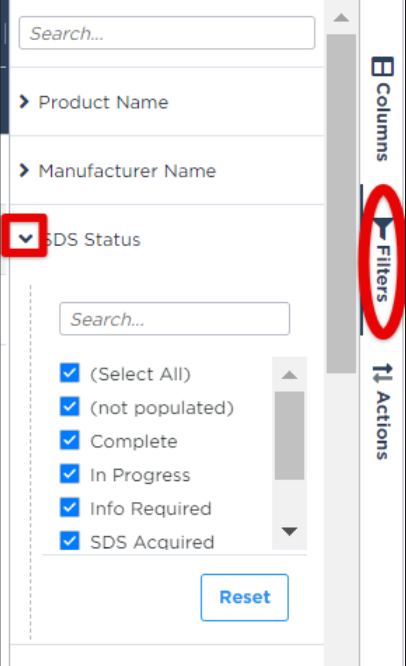
Righthand Filters Menu
When using the righthand menu item for Filters, click on the arrow next to each Column name to reveal results of your current data. Select/deselect or search for the desired data to include in the grid, The grid will update automatically as you are selecting/deselecting specific filters.
Filter by Columns in the Grid
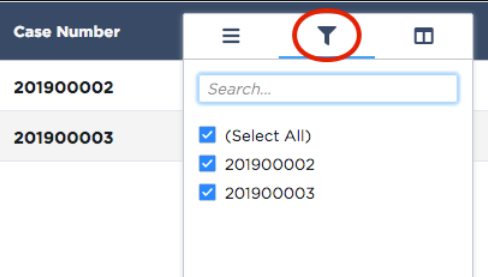
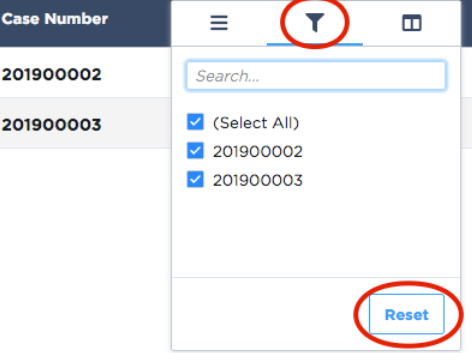
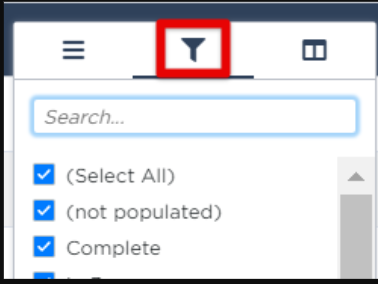
Columns can also be filtered individually by hovering over the column header to reveal a stack of lines; click to open additional options. Then, click on the filter icon to reveal that column's filter options.
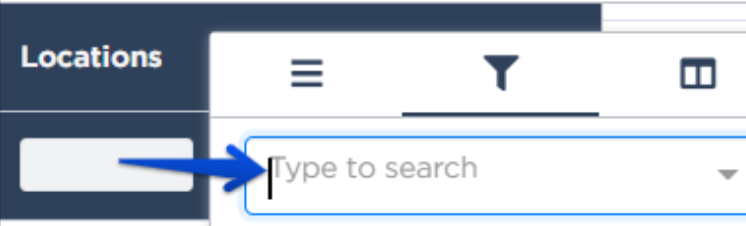
Filtering with Search Filters Row
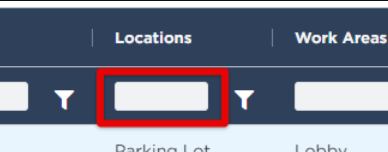
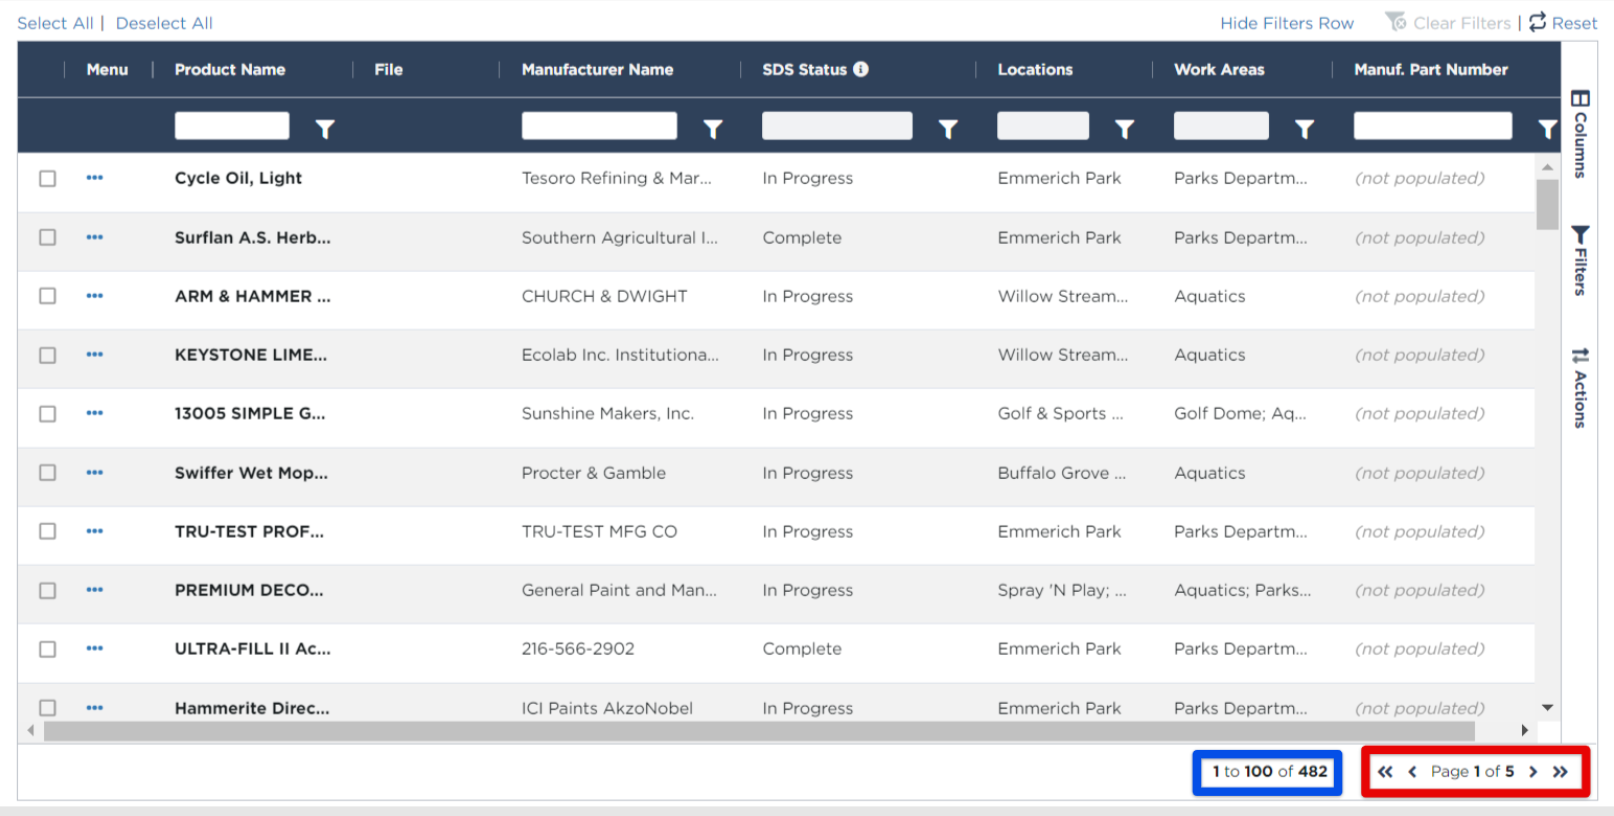
Additionally, you can search and filter right within the grid to reveal specific data. In the example below, the grid has been filtered to display specific data based on a selection from the company's Locations. Click into the search bar under the specific column. For the Locations column, you have the ability to type and search for a specific location/s and then select multiple from the list to display in the grid.
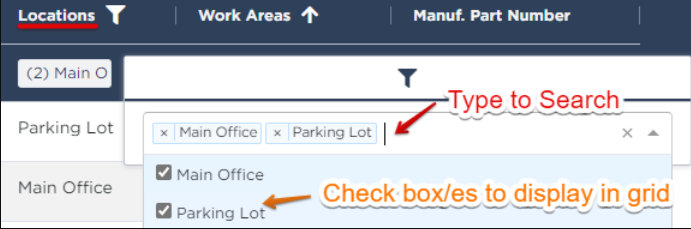
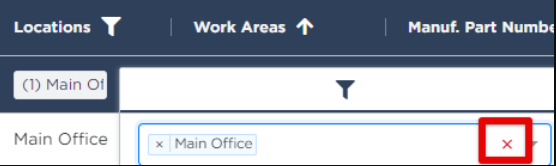
To remove a filter for a specific column, you can click the X in the search field.
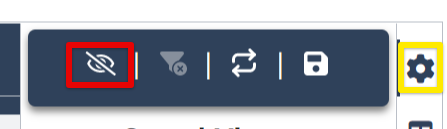
Hide/Show Filters
If you would like to hide (or show) the filters feature, click the cog wheel to the right of the grid and select hide/show filters. The search fields will then be hidden.
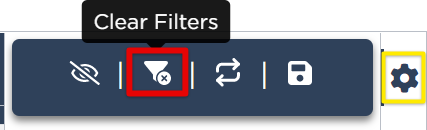
Clear Filters
To clear any filters you may have selected for your grid, click the cog wheel to the right of the grid and select Clear Filters.
Reset Filters
If you'd like to completely reset the grid to the system's default view, click Reset.
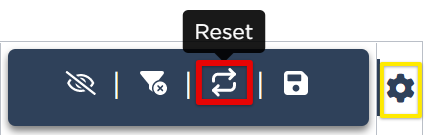
Note: The final button (Save) in the settings row relates to Saved Views. See Saved Views later in this article for more information.
Pagination
Pagination allows for improved loading times for larger data sets. The pagination feature is located at the bottom right of the grid. Each page includes 100 records. In this example, you can see that Page 1 displays records 1-100 out of a total of 482 records, across a total of 5 pages.
When advancing to the next page/s you will see the record set updated at the bottom of the grid.

Understanding this pagination feature is important when selecting data for reporting purposes. The next section will discuss actions you can take within the grid, including the Select All/Deselect All feature and how it works with Pagination.
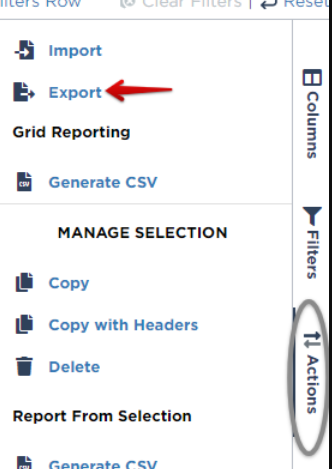
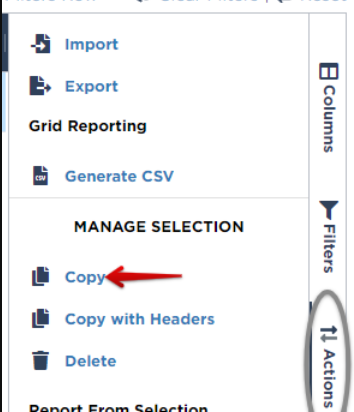
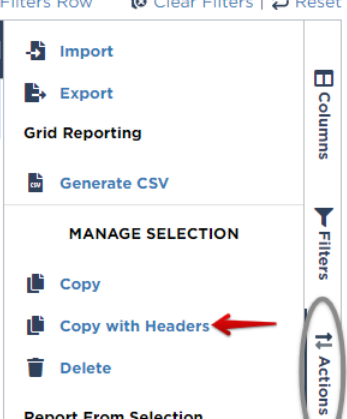
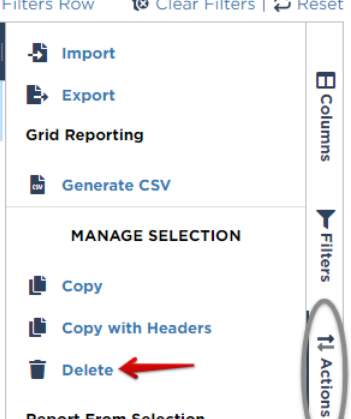
Actions
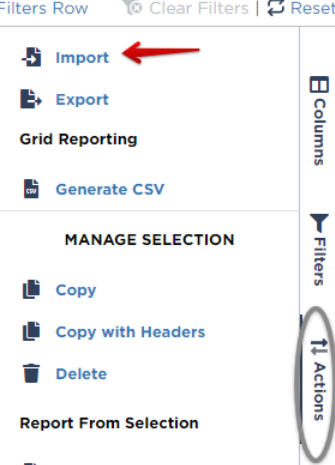
Actions are great for reporting and allows you to Export, Import, or generate CSV, Excel, or XML files based on the view that has been generated by the columns and filters.
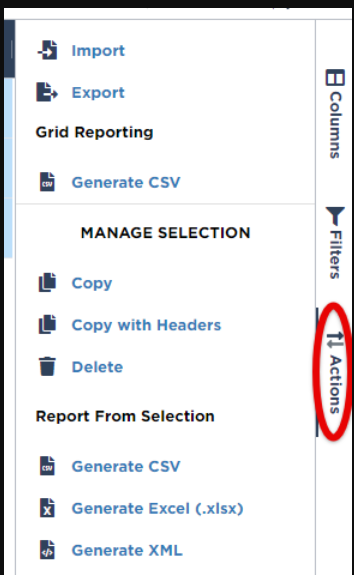
The Import and Export functions take you to the Import/Export Center. This is where you can import large data sets in mass, or export all of your records out of the site. Exports are in the same format required for a subsequent import, in the event a mass update is needed.
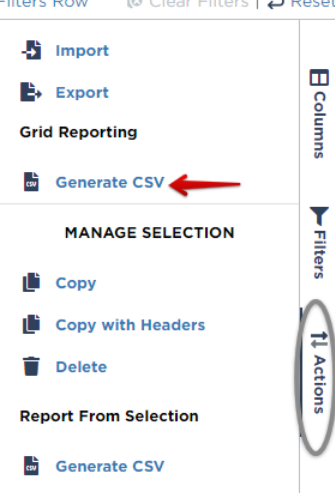
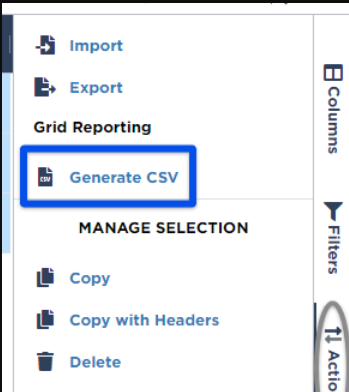
Grid Reporting
To generate a CSV file of your entire grid (including all pages of grid data and all filters/columns you have exposed/set), select Generate CSV under the Grid Reporting section.
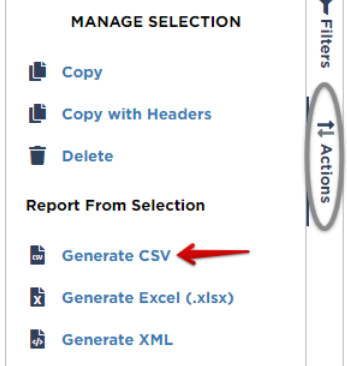
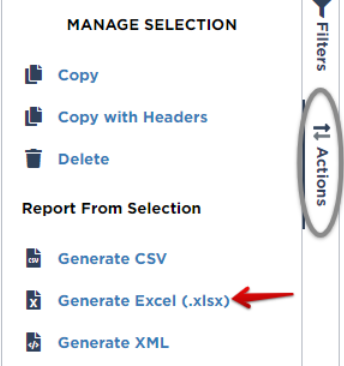
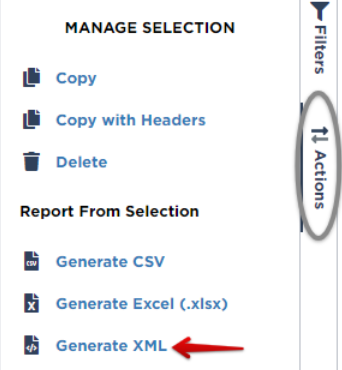
Reporting from Selection
If you want to generate a report that includes only select data from your grid (ex. only 3 of the results from the grid), you can do so by selecting the checkboxes next to the desired rows.
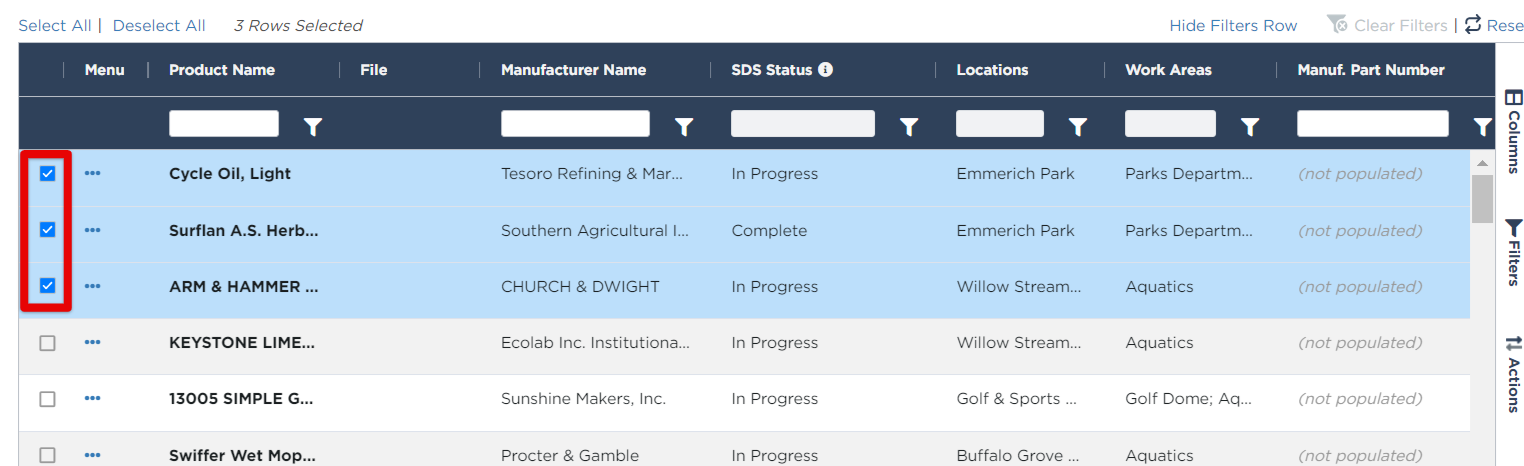
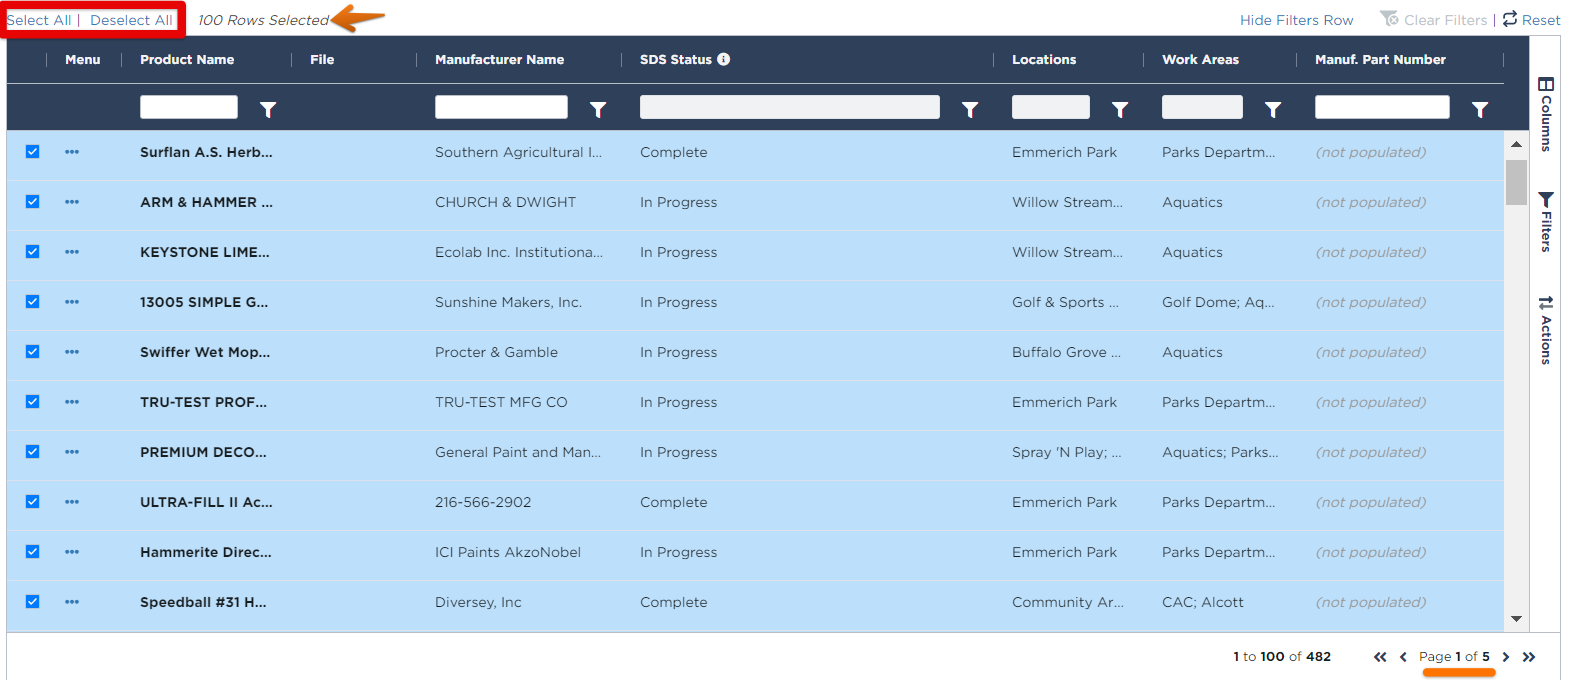
Additionally, you can Select All/Deselect All rows to help with including/excluding larger sets of data in reporting. Click Select All/Deselect All at the top left of the grid (shown in red below) to select all rows from the current page you are on. To include/exclude data across multiple pages, you will need to proceed through all pages and select/deselect rows you wish to display in the report. Simply click through the pagination function at the bottom right of your grid and keep selecting data until all desired rows have been chosen. You can see how many rows are currently selected at the top left of the grid (shown with the orange arrow below). As you go through each page and select more rows, this number will increase.
After all desired rows are selected, click the Actions tab. Select your preferred file format from the "Report From Selection" section.
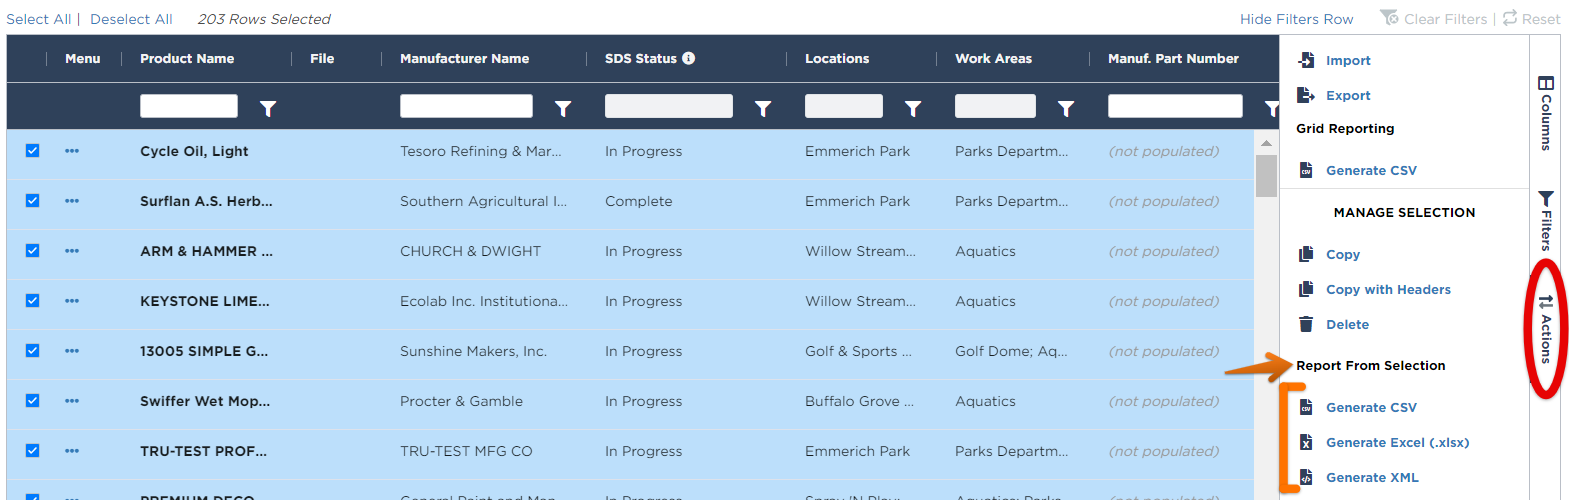
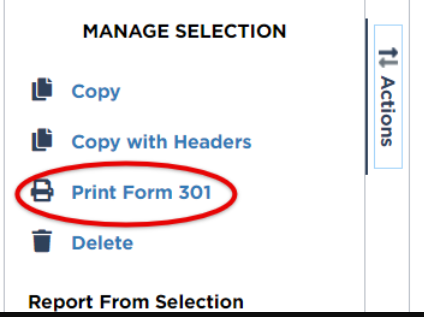
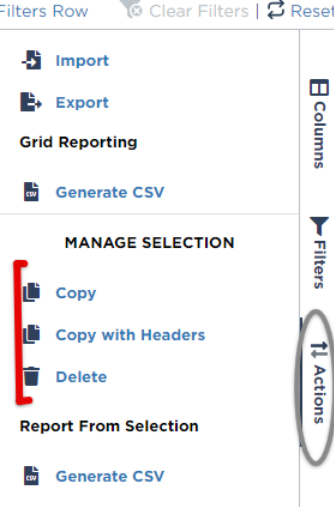
Managing Selection
Here you can also "Manage" your selection by copying the data into another type of document on your device (ie. an Excel file), or by deleting the selected data and its associated information/tasks from the system entirely.
Saved Views
To the right of the grid and located above the Columns/Filters/Actions buttons, locate the cog wheel. When you filter, add columns, etc. in order to view specific sets of data, you are able to save and name that grid configuration to view another time. Additionally, you can set a configuration as a "default", allowing the page to load up that default view anytime you return to the grid.
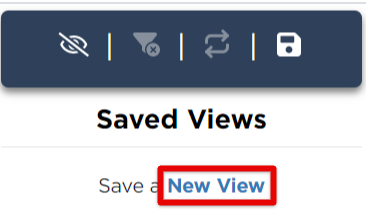
Save a New View
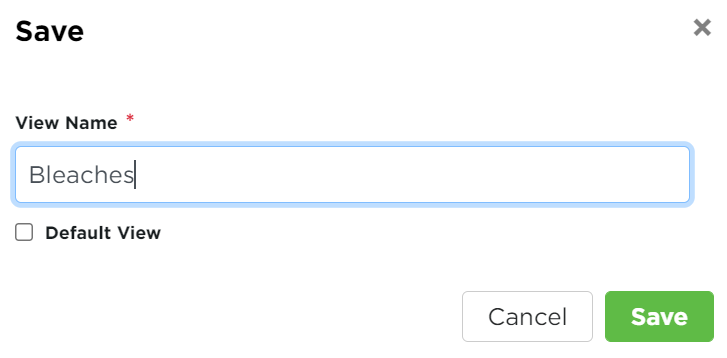
When all desired data is displayed in your grid, and you'd like to save this view for future reference, click Save a New View.
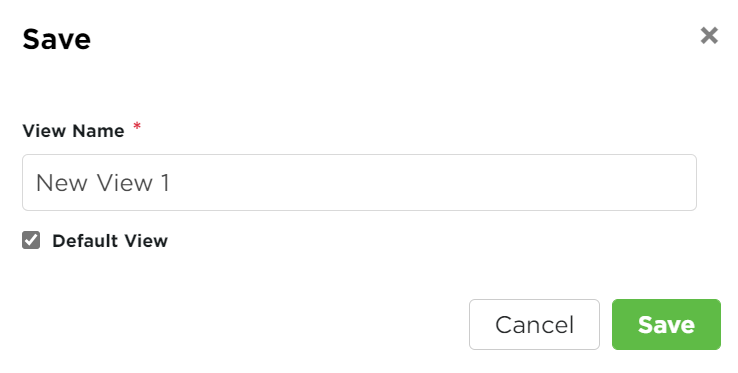
Enter a name for the view. If you'd like this view to be the default for each time you return to this grid, check the box for Default View.
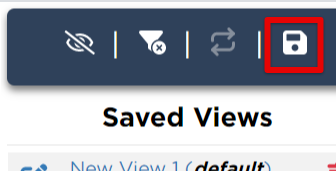
To save any additional grid configurations that you set, click the Save button.
Name the view and Save.
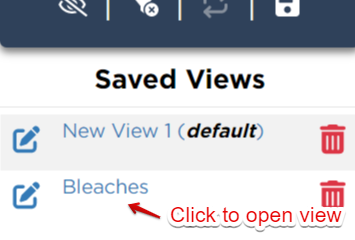
You will see your list of Saved Views populate in the Saved Views box. Simply clicking on the name will display that view in the grid.
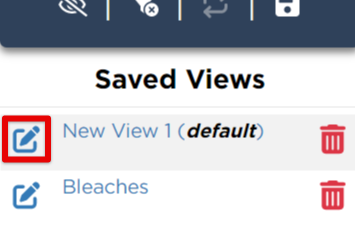
Edit or Delete a View
To edit a view, click the pencil icon next to the name of the view. Here you can change the name or set/unset is as a default view.
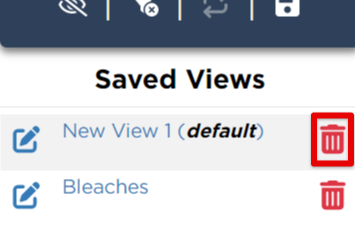
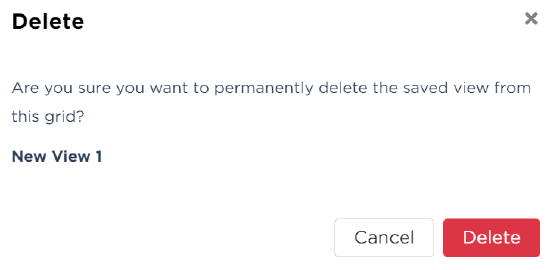
To delete a view, click the trash can next to the desired view. You will be prompted to confirm the deletion.
Note: Once a view is created, you are not necessarily able to make changes to that view. If you decide to add additional filters, columns, etc. to that view, you will need to save it as a new view. You can then delete the previous view if needed.
Quick Definitions
| Action | Function | Location |
| Hide (or Show) Filters Row | Hides the Search to Filter Row under each column |
The cog wheel in the upper right of the grid
|
| Clear Filters | Clears all active filters |
The cog wheel in the upper right of the grid
|
| Reset | Clears all active filters and resets all grid columns to the default state when the page loads |
The cog wheel in the upper right of the grid
|
| Select All/Deselect All | Select/Deselect all rows on the page |
Above the grid, upper-left corner
|
| # of Rows Selected | Notes how many rows across the entire grid are selected. |
Above the grid, upper-left corner
|
| Pagination |
Shows what record set is currently displayed on your grid. (ie. 1-100 of 482 means that the grid is currently showing records 1-100 out of a total of 482 records. This number will updated as you page through the grid.)
Also shows what page you are on and how many pages there are. (The double arrows will bounce you to the last/first page of the grid) |
Below the grid, lower-right corner
|
| Columns | Opens selector for all grid columns |
Right-hand grid menu
|
| Filters | Opens selector for all grid filters |
Right-hand grid menu
|
| Actions | Opens selector for all grid-level actions |
Right-hand grid menu
|
|
Import Data |
Opens the Import Center with the data set and "Import" pre-selected |
Right-hand grid menu > Actions
|
| Export Data | Opens the Import Center with the data set and "Export" pre-selected |
Right-hand grid menu > Actions
|
| Grid Reporting - Generate CSV | Will generate a .csv file of all data in the entire grid, across all pages. |
Right-hand grid menu > Actions
|
| Report From Selection - Generate CSV | Downloads a .csv file with all rows, all exposed columns, with column headers |
Right-hand grid menu > Actions
|
| Report From Selection - Generate Excel (.xlsx) | Downloads a formatted .xlsx file with all rows and all exposed columns with headers |
Right-hand grid menu > Actions
|
| Report from Selection - Generate Excel (.xml) | Downloads an .xml file with all rows and all exposed columns with headers |
Right-hand grid menu > Actions
|
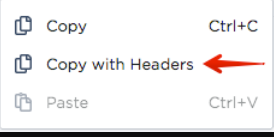
| Manage Selection - Copy | Copies all cell data for selected rows to the clipboard |
With row(s) selected, Right-hand grid menu > Actions
or Right-click the row in the grid > Copy
|
| Manage Selection - Copy with Headers | Copies all cell data for selected rows with column headers to the clipboard |
With row(s) selected, right-hand grid menu > Actions
or Right-click the row > Copy
|
|
Manage Selection - Print Form 301 Only visible in Incident Recordkeeping |
Allows for printing of Form 301 for selected rows |
With row(s) selected, right-hand grid menu > Actions
|
| Manage Selection - Delete | Deletes selected rows from system after confirmation modal |
With row(s) selected, right-hand grid menu > Actions > Delete
or Menu in the grid > Delete
|
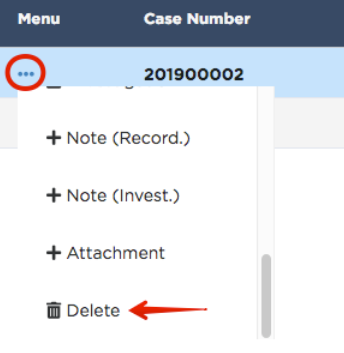
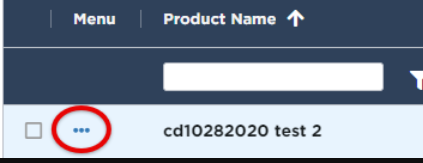
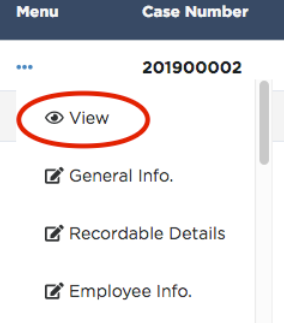
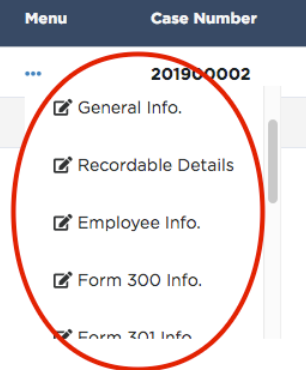
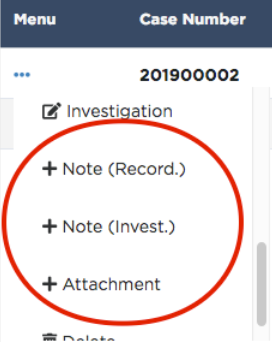
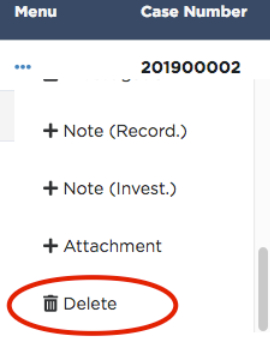
| Row Menu | Opens the row-actions menu (View, Edit, Delete, etc. for this record |
Grid Column 2 on the load page
|
| View | Opens the view page for this record |
Row Menu > View
|
| Edit | Opens the edit page for this record |
Row Menu > Any of the edit options
|
| Add | Adds to this record without opening view/edit page (note, attachment, task, etc.) |
Row Menu > Any of the add options
|
| Delete (Single) | Deletes this record only |
Row Menu > Delete
|
| Sort |
Clicking the column header once sorts the data in ascending order (low to high, old to new, etc.) Clicking the column header twice sorts data in descending order (high to low, new to old, etc.) Clicking the column header three times resets the order to the default when the page loaded |
Column header (on-click)
|
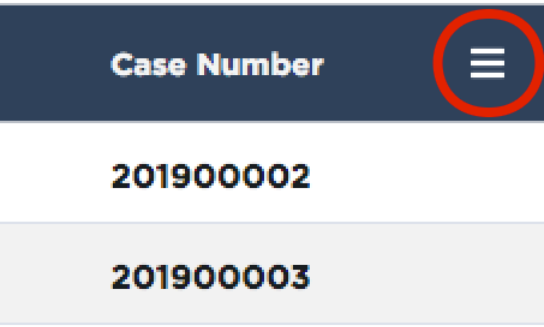
| Column Header Menu | Opens the column actions menu |
Column header (on- hover)
|
| Pin Column | Pins/Un-pins the column from the left or right |
Column Header Menu
|
| Autosize this Column | Adjusts this column width to fit column data |
Column Header Menu
|
| Autosize All Columns | Adjusts all column widths to fit column data |
Column Header Menu
|
| Reset Columns | Resets all grid columns to the default when the page loads |
Column Header Menu
|
| Filter | Adds filter for this column |
Column Header Menu
|
| Reset Filter | Clears filter for this column |
Column Header Menu
|
| Add/Remove Column | Adds or removes columns from the grid |
Column Header Menu
|