ELD Device List
This article explains the purpose and use of the ELD Device List in Encompass®, which provides a centralized view of all connected ELDs. Accessible only to users with the Encompass® ELD Admin Role, the list allows monitoring of Odometer Calibrations, viewing detailed ELD information, and assigning or unassigning devices to Vehicle Unit Records. It also outlines how ELDs appear in the system automatically when installed and configured, as they cannot be manually added or have certain system-generated data edited. The guide includes instructions for accessing the list, reviewing key fields such as Tractor Number and Unit Code, and deleting ELDs when necessary. Proper alignment of Unit Codes and regular Odometer Calibrations are emphasized for accurate data tracking and fuel tax reporting.
About the ELD Device List
As the vehicles become setup with ELDs and the Encompass® ELD application is activated, ELDs will begin to show up in Encompass. If the driver enters the truck number in the mobile application that matches exactly to the corresponding unit code in Encompass, the ELD will automatically assign to the unit in Encompass. If the truck number was incorrectly entered by the driver, the ELD will show up in an alert called Unassigned ELDs.
In order to get a listing of all of the ELDs in one view, the ELD Device List was created. This is only available to be seen for users with the Encompass® ELD Admin role turned on. The user should reach out to their system administrator to see if their user roles should be adjusted.
For those Monitoring Odometer Readings
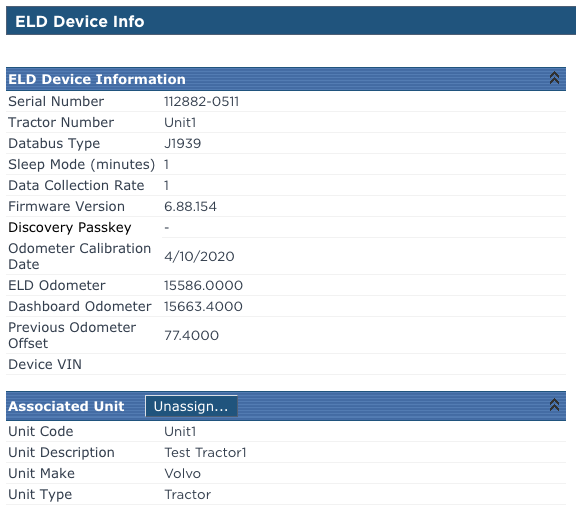
The monitoring of odometer calibrations is primarily done from this ELD Device List screen. Simply click on the serial number of the ELD. Within the ELD Device Info screen, the current offset as well as the previous offset can be seen. When drivers calibrate they are required to enter the correct number on their device. If a driver enters a value that is off by a percentage from the last calibration, they will receive a warning message.
To View the ELD Device List
Start from the Vehicle Management area (Note: The link is not available from Driver Management tab.)
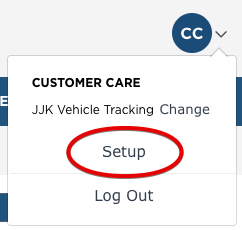
Go to Setup
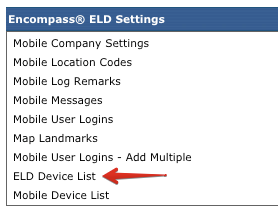
Scroll down to Encompass® ELD Settings. Click on ELD Device List to view the list of ELDs.
Information about the individual ELDs can be reviewed by clicking on the Serial Number of the ELD.

Fields of note:
- Tractor Number - The vehicle number entered in Encompass during configuration (if this tractor number is incorrect, it will need to be changed by the Encompass® ELD user in the application).
- Firmware Version - Provides the version of the firmware on the ELD.
- Odometer Calibration Date - The last date in which the odometer was calibrated in Encompass® ELD.
- Dashboard Odometer - The odometer reading shown on the dash that the Encompass® ELD user entered on the Odometer Calibration Date.
- Unit Code - The Unit in Encompass that the ELD is assigned to.
These details are dependent on a Encompass® ELD user being connected to the ELD and has a valid internet/network connection for this information to be sent to Encompass.
Note: If using the Fuel Tax portion of Encompass, the Tractor Number and Unit Code MUST match in order for trips to properly generate. Additionally, odometer calibrations should be done once every 30 days.
To Add ELDs
Unlike other records in the system, notice there is no "Add ELD" button. ELDs are detected from data received from Encompass® ELD and therefore cannot manually be added. Once the ELD is installed in the vehicle, an Encompass® ELD user connects to the ELD, and configures it, the ELD will show in Encompass.
Can an ELD in this list be edited?
No. Things like Odometers, Serial Numbers and Databus types are coming from a combination of Encompass® ELD and the engine. These aren't editable on the Encompass® side.
What Can be done?
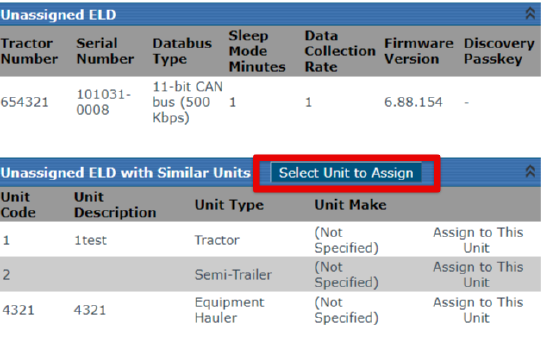
- Assign and Unassign ELDs to unit records
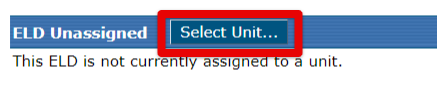
- Click the Serial Number to open up the ELD information. Click Select Unit in the ELD in the ELD Unassigned section. On the next screen, you can Select Unit to Assign, or view the list of similar units and assign the ELD to one in the list by clicking Assign to This Unit.
- Click the Serial Number to open up the ELD information. Click Select Unit in the ELD in the ELD Unassigned section. On the next screen, you can Select Unit to Assign, or view the list of similar units and assign the ELD to one in the list by clicking Assign to This Unit.
- Delete an ELD from the listing
- View ELD information such as the last time the odometer was calibrated and what the dashboard odometer was showing
How to Delete an ELD
From the ELD Device Listing, click the Delete ELD link

Confirm Delete by clicking Yes
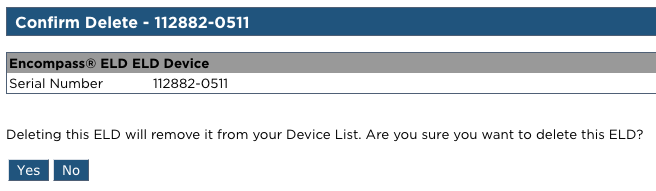
A success message will be displayed and the ELD will be removed from the list.