Processing Applications
This article outlines the steps for processing Applicants in Encompass, guiding users through Screening, Investigations, Report Requests, and Prequalification to move Applicants through the Hiring Process. Users with appropriate roles, such as Hiring Authority or Recruiter, can apply the Screening Process, continue processing, or reject applicants, while tracking progress via the Applicants page. Investigation steps include requesting Background Reports from third-party vendors and reviewing completed documents. The Prequalification Checklist consolidates signed and unsigned forms for review and status tracking, ensuring all necessary steps are complete before qualifying an Applicant. Once ready, Applicants are moved to the Hiring Authority in the Ready to Hire tab to continue the official Hiring Process.
When an Applicant is added to the system, Encompass Users who have the appropriate User Roles assigned (set up in Settings > Users) can begin processing applications. This process is, essentially, the first step in beginning to move an Applicant through the Hiring Process.
Popular User Roles to apply are:
- Applicant (View Only)
- Applicant (View+Edit)
- Hiring Process - Hiring Authority (This role provides a User the ability to work through the official Hiring Process. This role provides more access than just Processing Applications)
- Hiring Process - Recruiter (This role can be assigned so that Encompass Users have the ability to be assigned Applicants based on the Applicant's state/territory.)
- Hiring Process Attachments (View Only)
- Hiring Process Attachments (View+Edit)
Employment Application Processing
On the Applicants page, view the In Progress > Employment Application Processing sub tab for a list of Applicants ready to apply the screening process to.
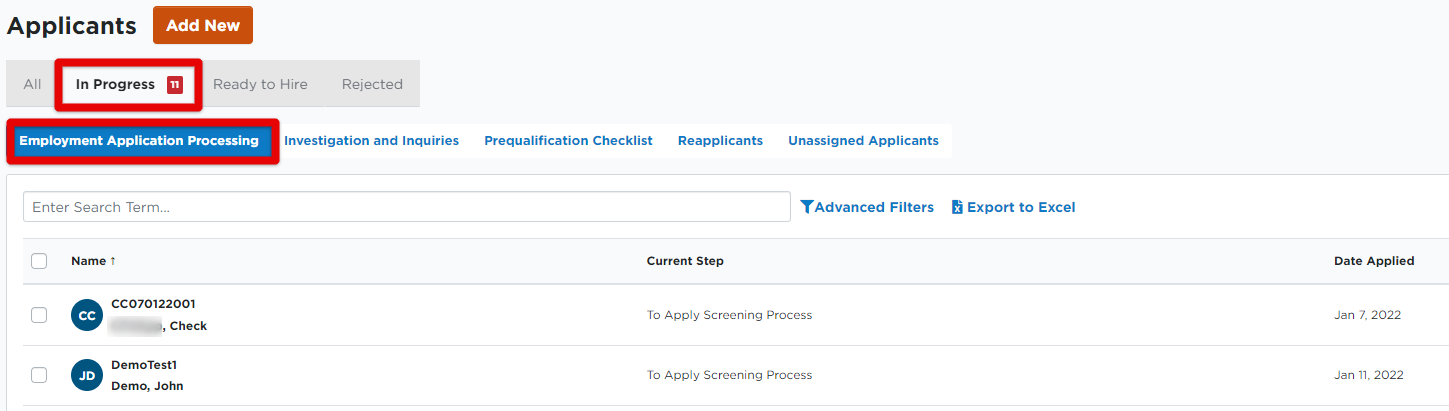
There are a few ways to apply the screening process to the Applicant:
- Hover over the desired Applicant's line and click Apply Screening Process.

- Check the box next to the desired Applicant and then click Apply Screening Process in the pop-up bar that appears.

- Click on the Applicant, then select the Application Process tab. Click Apply Screening Process.

Now, you can either continue processing the Applicant or reject their application. Click on the Applicant's name to view any information about the Applicant (shown in blue below). Otherwise, hover and click on Continue Processing (shown in red below) to move the Applicant to the next step of the Hiring Process. Hover and click Reject to reject the Applicant and remove them from the Hiring Process.


Additionally, you can click into the Applicant's name and select the Application Process tab. Here you can also continue processing or reject.
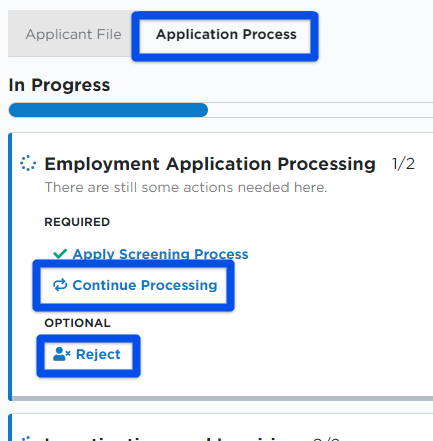
As you are moving through the process, the main Applicants page will display the Applicant's progress. Here you can see the Applicant is on step 2 of 6.
You can also click into the Applicant's name and select the Application Process tab to see what items have been/need to be completed in the application process.


Investigation and Inquiries
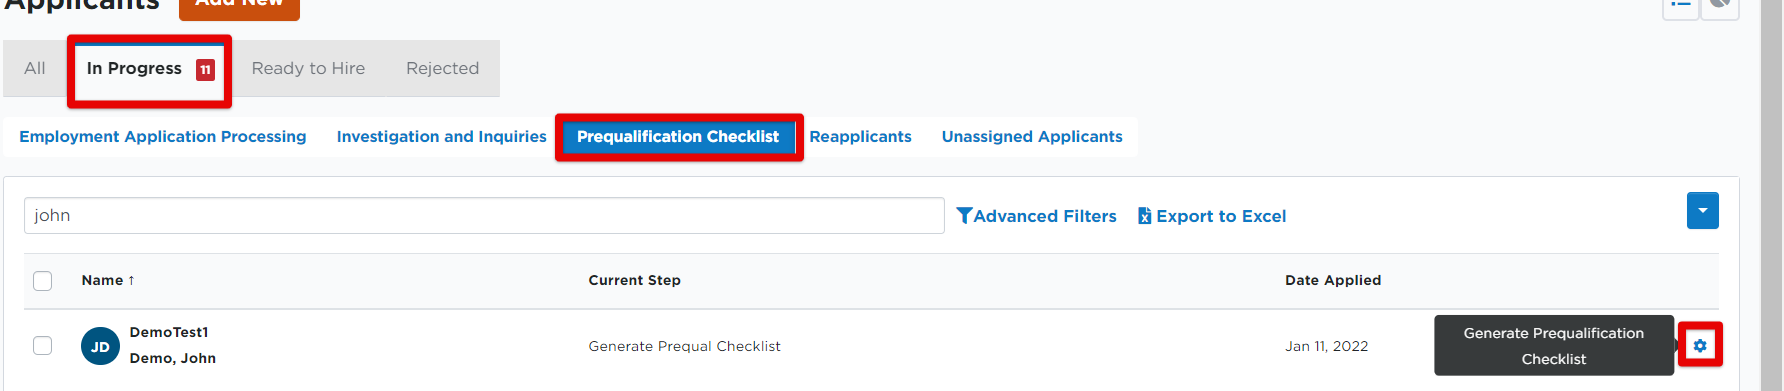
For the next step in processing Applicants, you can click on the In Progress > Investigation and Inquiries sub tab. You will see the Current Step the Applicant is on.
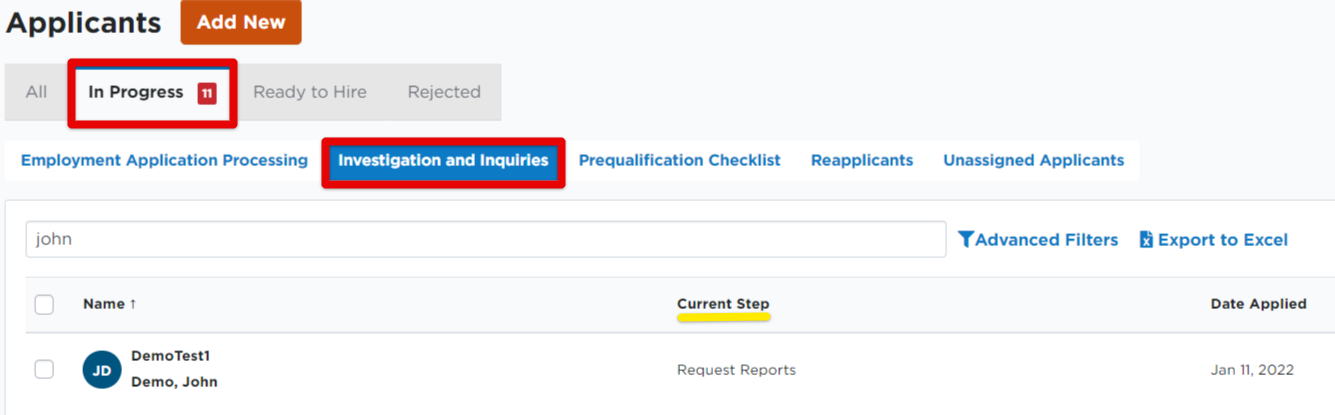
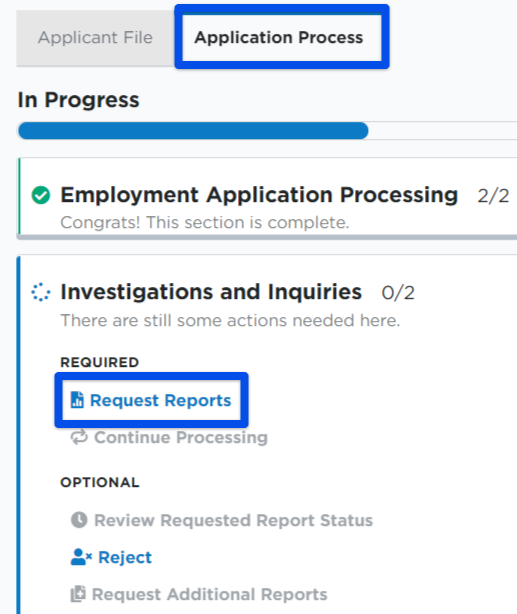
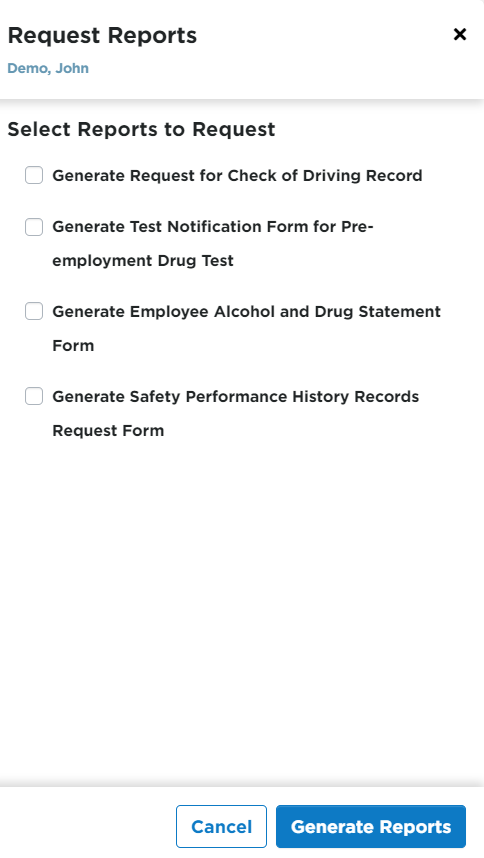
Hover and click Request Reports (shown in red below), or go into the Applicant's file to select Request Reports from the Application Process Tab (shown in blue below).

From the Request Reports screen, select the appropriate report(s) to generate. Then, click Generate Reports.
NOTE: Make sure that any pop-up blockers are disabled before clicking on Generate Reports as these reports will open in a new window/download to your device.
When requesting Background Reports, any documents that may have already been signed will display a message that a signed form may already exist. If a user generates a new form, it will download an unsigned copy of the form to the browser.

If a third party vendor is chosen to request Background Reports for the applicants, the user will have the ability to select the appropriate Background Reports based on the contact the company has with the vendor. Depending on the vendor, there may be another window that appears to allow the user to log into the vendor's website to choose the needed Background Reports.
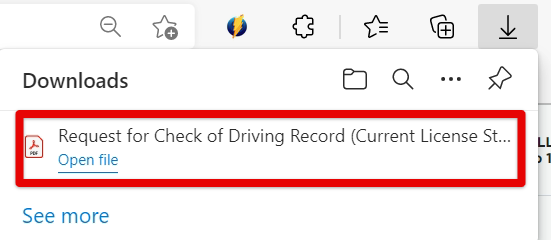
The report/s will download to your device. Depending on your device, your downloaded file message may look different. Open the file to review and/or print.
When reports have been requested and any Applicant information has further been reviewed, your next steps could be:
- Review Requested Report Status - Review the process date(s) of the report(s) selected to generate.
- Continue Processing - Moves the Applicant to the next step of the Hiring Process.
- Reject - Reject the Applicant and remove them from the Hiring Process.
- Request Additional Reports - Request any additional reports needed.


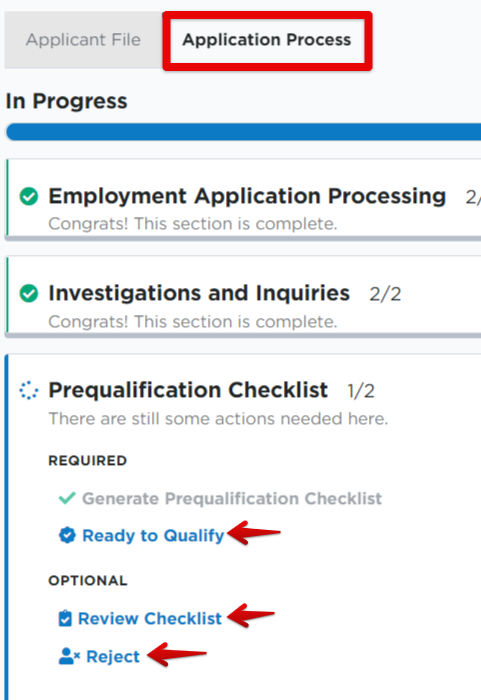
Prequalification Checklist
The next step in processing applications is to Generate the Prequalification Checklist.
Any documents signed in the Online Application are available to view prior to the generation of the Prequalification Checklist. They can be viewed in the Applicant Prequal Attachments card of the Applicant file shown in the image below.

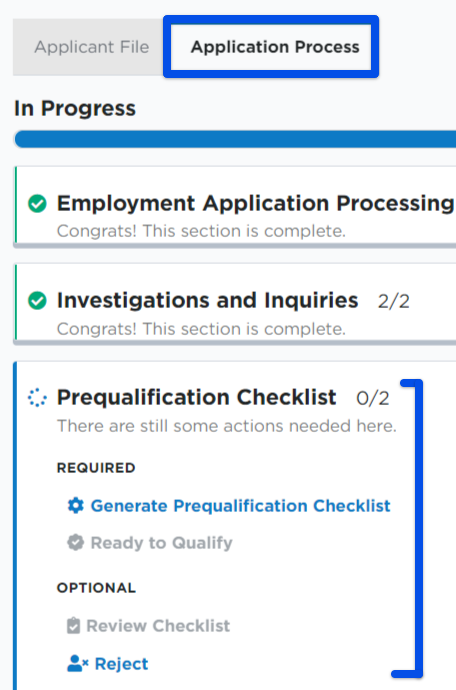
Hover and click the gear icon to generate (shown in red below). Or click Generate from the applicant's Application Process tab (shown in blue below).
The creation of these Checklist item forms depends on your system configuration. To change this setting, go to Settings > Applicants > Prequalification Checklist.
Next, you can:
- Review the Checklist to mark items as complete/received/etc.
- Mark the Applicant Ready to Qualify
- Or Reject the Applicant
Hover and click on the appropriate icon to make your selection.

Do remember that you can also make these selections in the Application Process tab of the Applicant's file:
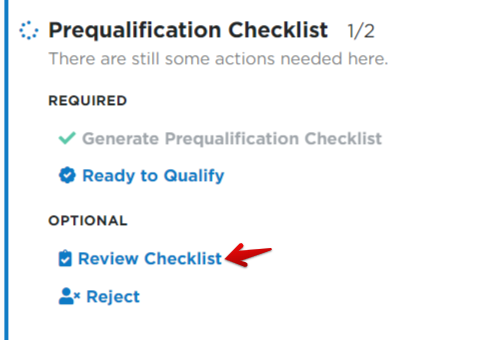
Review the Prequalification Checklist
Click on Review Checklist to go to the Review Pre-Qualification Checklist screen.

Upon the creation of the Prequalification Checklist in the Hiring Process, the selected forms (not signed) will download to the browser so the user can review them. The signed documents from the Online Application will already be attached to their respective Checklist items within the Prequalification Checklist.

Enter the Process Date and Status fields when each item is received/completed/etc. Click Save when all the process dates have been completed for the Prequalification Checklist items.
This Checklist doesn't need to be completed all at once. If some of the items have been received but some are still in process, this area can be used to keep track of what has and has not yet been completed. The Applicant is not moved forward or removed from the Hiring Process until the Ready to Qualify or Reject links are clicked on the prior page.
Qualifying Applicants for Hire
When the Applicant is ready to be moved to the Hiring Authority, click Ready to Qualify.

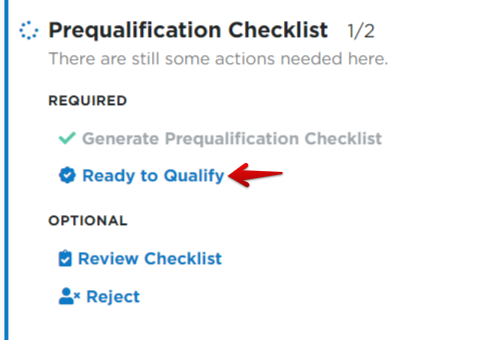
The User will then be directed to a Qualify Applicant pop-up. Click Yes to move the applicant to the Hiring Authority. If they should not be qualified yet, click No.

If you decide to qualify the Applicant, they are moved into a Ready to Hire status. They can be viewed in the Ready to Hire tab. The Encompass Hiring Authority can then move through the official Hiring Process.
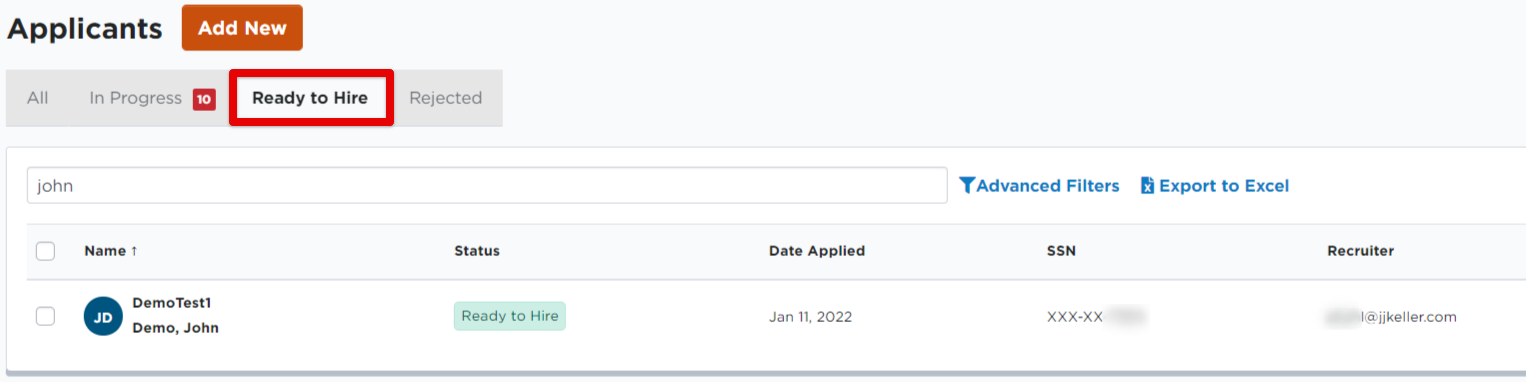
Note: Once Yes is selected here, the Recruiter will no longer be able to view the Applicant through the Hiring Process Alerts (in the Alert Center > Applicants tab). This is because the Applicant has moved to the Hiring Authority Alerts. The Applicant will now only be seen in the Ready to Hire tab by those Encompass Users with the Hiring Authority role.

For those with the Hiring Authority role or those who are ready to walk through the "Ready to Hire" process, view the Hiring an Applicant article for more information.