CEIBA II Instructions
Should your dash camera not be able to turn on to connect to your system, you can use the Micro SD card from the camera that has stored the events to retrieve video. You will need to remove the Micro SD card from the camera, insert the SD card into your computer/PC, and download a program called CEIBA II to retrieve video events.
*Reminder: the SD card will loop (or "write over") approximately every 7 days. Therefore, you will not be able to retrieve older video events from the SD card.
First, remove the Micro SD card from the camera:
1. Remove the camera from the mount
2. Locate the Allen Wrench that was included in the camera kit.
3. Locate the compartment under the camera and proceed to unscrew the lid
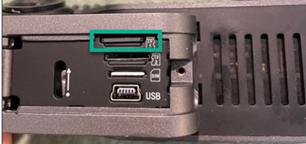
4. Locate the Micro SD card.
- The Micro SD Card (Memory Card) is shown in the green box below. (The other slot contains the SIM (cellular) card.)
5. Press down to eject the Micro SD card. The card should spring up to remove it. You may need to carefully work it out; there is a lip on one side of the card that you can use to help pull it out.
NOTE: Removing the memory card will not allow the camera to be used/record video data. You can replace the Micro SD card with a new one to keep using the camera while you are viewing video from the current Micro SD card in Ceiba II. When selecting a Micro SD card replacement, ensure that the card is a Class 10 High Speed, and no larger than 256GB (our recommended size is 128GB.)
Next, because the video on the SD card is encrypted, you will need to download and install a program called CEIBA II to watch the videos on your computer/PC. You will also need a Micro SD card port on the PC or an adapter for that Micro SD card, which can be found at most big box stores.
- First, download the program here: CEIBA II Download
- Next, follow these instructions to view and save video from the SD Memory Card in the CEIBA II Program: CEIBA II Instructions