Services and Repairs Records
This article explains how to manage Preventative Maintenance (PM) Schedules, Service & Repair Records, and Service & Repair Documents in FleetMentor to maintain an organized and compliant Maintenance Program. Users first set up a PM Service Schedule for each Vehicle, defining service items, odometer or hour intervals, and tracking last service dates. As services or repairs are completed, Service Records are added, including service type, work performed, vendor details, costs, and optional supporting documents. Uploaded files are stored under Service & Repair Docs for easy retrieval, and all records integrate with the PM Schedule to update Vehicle Maintenance History automatically. Maintaining these records digitally ensures visibility, accurate scheduling, and streamlined compliance with maintenance requirements.
Step 1 – PM Service Schedule
PM or Preventative Maintenance is the cornerstone of a solid Maintenance Program. An example of a PM Schedule would include PM-A (safety check), PM-B (oil change and safety check), PM-C (annual inspection and service), and PM-D (special services). They may also be referred to as Service A, Service B, etc.
To set this up, select Add/View Vehicles from the Vehicles tab at the top.

A roster view of all the Vehicles will be displayed.

Click on the Vehicle # to edit the record.

From the Vehicle Profile, the Services & Repairs tab is selected.


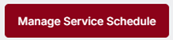
Scroll to the bottom of the page and click the Manage Service Schedule button.

A slide out modal will display to enter the scheduled service item(s).

- Current Odometer – This is the mileage baseline used to calculate when the next service is due.
- Current Hour Meter – This is the hour baseline used to calculate when the next service is due.
- NOTE: One or both of the metrics above can be added.
- Service Intervals – Alerts are triggered by Odometer, Hours, or Both, whichever comes first.
- Service Items – Think of this as your work order. What work needs to happen when this vehicle comes in for service?
Next, click the Manage Service Items button.
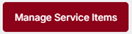
A slide out modal will display with a pre-defined list of service items.

Additional items can be added to this list by clicking the Add Custom Item + option at the bottom of the list or under Settings > Custom Data-Vehicle. Select as few or as many service items as needed.

Click Save to insert your service items.

Once saved, your service items are inserted. Enter the following details to complete your schedule.

- Odometer at Last Service – This is different from your current odometer because it tracks the last time the Vehicle was serviced as opposed to Current Odometer which is where the Vehicle is today.
- Service Mileage Interval – The interval in miles for when this service is triggered.
- Hours at Last Service – This is different from your current hours because it tracks the last time the Vehicle was serviced as opposed to Current Hours, which is where the Vehicle is today.
- Service Hours Interval – The interval in hours for when this service is triggered.
Click Save to complete the Service Schedule.

NOTE: You will not find an Edit option under PM Service Schedule. Instead, click the Manage Service Schedule button to update or change your schedule. Selecting Manage Service Schedule ensures a full picture of the PM for this Vehicle is considered rather than individual components.
Step 2 – Service & Repair Records
Now that Step 1 is complete, let's review Step 2:
- Step 1 – Determine the PM Service Schedule appropriate for your vehicle.
- Step 2 – As repairs or services are completed, add your Service Records and include the Service Type. If the Service Type aligns with your PM Service Schedule, the PM Service Schedule is updated with the new odometer or hours data.
- Step 3 – Save your document image to the Service record. This can be done when entering the Service record or independently as appropriate. Maintaining an electronic maintenance file provides visibility and easy access to all service records for this vehicle.
To set this up, select Add/View Vehicles from the Vehicles tab at the top.
A roster view of all the Vehicles will be displayed.
Click on the Vehicle # to edit the record.
From the Vehicle Profile, the Services & Repairs tab is selected.
Under Service & Repair Records, click the Add Service Record button.

A slide out modal will display for the information needed to add a Service Record.

- Date – Enter the date of the Service Record.
- Service Update – Update Odometer and/or Hours at the time of Service.
Click the Add Service Item button to enter the line items completed during this service or work order.

A slide out modal will display to enter the relevant details of the completed service.
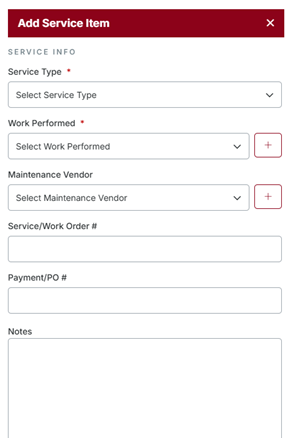
- Service Type – Dropdown option to categorize why the service was done. If Preventative Maintenance is selected, and the line items are consistent with the PM Schedule for this Vehicle, the PM Schedule will be updated with the Mileage and/or Hours. The dropdown option also includes entries for Inspect, Overhaul, Repair, and Replace.
- Work Performed – Select one or multiple line items to describe the work completed in the service. If additional work was done but not found in the Work Performed list, use the + option to add it.
- Maintenance Vendor – Maintenance records can be tracked for both internally completed maintenance and maintenance completed externally by a vendor. Select the appropriate Maintenance Vendor if externally completed. If the vendor is not listed in your dropdown, use the + option to add it.
- Service/Work Order # – Identification of the Service Record.
- Payment/PO # – When maintenance is completed externally, track the Purchase Order (PO) or payment information for a complete transaction.
- Notes – Any relevant information about the service completed.
Continue to scroll through the slide out modal to enter the Service Costs. Enter details provided on the service, work order, or invoice. If the information is not available immediately, come back to edit it at a later date.

- Parts – Cost of parts associated with the Service Record.
- Labor – Cost of labor associated with the Service Record
- Tax – Tax associated with the Service Record if applicable.
- Other – Any other cost associated with the Service Record.
Click Save or Save & Add Supporting Doc to complete the Record. Adding a supporting document allows you to have an easy-to-trace electronic Maintenance Record for the Vehicle.

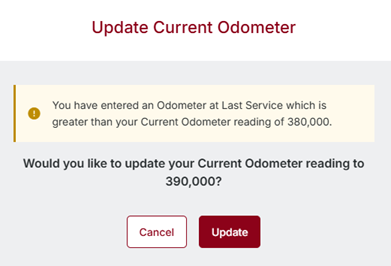
When the Record is saved, if the Current Odometer reading has been updated, you will be prompted to confirm you want the new Current Odometer to be updated in the Vehicle Record. Remember, Current Odometer is found on the Vehicle Profile Card and the General tab under the Vehicle.
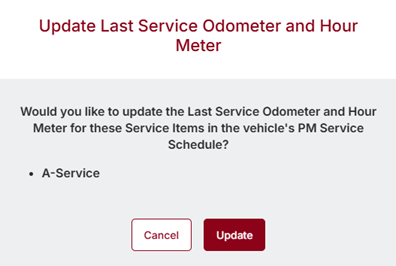
When Record is saved, you will be prompted to determine if you want the Last Service Odometer and Hour Meter to update under the PM Service Schedule. Updating the Last Service Date in PM updates the PM schedule so the next PM Service can be accurately calculated.
To upload an electronic Record, scan the Record, save it to your local system, and browse your files to locate it. You can drag and drop up to 10 files at a time.
NOTE: The speed of the scanning and upload are directly related to the number of items dropped or the size of the files.
As the files are scanned as per our J. J. Keller Security Protocol, you will see the progress bar change colors to indicate success or failure. An entry is made below to label the images. Enter a Document Description to help identify the Record if the file name itself is not sufficient.

Images saved as a supporting document are located under Service & Repair Docs.
Step 3 – Services & Repairs Docs
Now that Step 1 and 2 are complete, let's review Step 3:
- Step 1 – Determine the PM Service Schedule appropriate for your vehicle.
- Step 2 – As repairs or services are completed, add your Service Records and include the Service Type. If the Service Type aligns with your PM Service Schedule, the PM Service Schedule is updated with the new odometer or hours data.
- Step 3 – Save your document image to the Service record. This can be done when entering the Service record or independently as appropriate. Maintaining an electronic maintenance file provides visibility and easy access to all service records for this vehicle.
To set this up, select Add/View Vehicles from the Vehicles tab at the top.
A roster view of all the Vehicles will be displayed.
Click on the Vehicle # to edit the record.
From the Vehicle Profile, the Services & Repairs tab is selected.
Under Service & Repair Docs, click the Manage Document(s) button.

A slide out modal will display where you're able to manage Service & Repair Document(s).

NOTE: Any documents already uploaded as part of your previous Service Record entries will all be displayed in the same area, making management of files as simple as a folder with paper in it.
To upload an electronic Record, scan the Record or browse your files to locate it. You can drag and drop up to 10 files at a time.
NOTE: The speed of the scanning and upload are directly related to the number of items dropped or the size of the files.
As the files are scanned as per our J. J. Keller Security Protocol, you will see the progress bar change colors to indicate success or failure. An entry is made below to label the images. Enter a Document Description to help identify the Record if the file name itself is not sufficient.
To delete an image(s), select the Delete (trashcan) icon on the right side of the page.

Confirm the deletion by clicking the Delete button or click Cancel to go back.
